
Particle Disintegration
Spring 2025
Overview
For this disintegration project, I wanted to create a scene based off of Michelangelo’s painting, the Creation of Adam. Taking inspiration with the position of the hands, along with taking into account the requirements of the assignment, I created a disintegration effect for the uppermost hand. The workflow uses Pyro Source Spread to create the particle source points with some cleanup and adjustments in between. All models used for the hands and environment are listed at the bottom.
Source Points
To begin, I knew I wanted to have multiple origin points for the disintegration effects, therefore based the effect off of a Pyro Source Spread.
Using a Group node, I use the bounding sphere in order to set source points to the group “hot”. Each finger has its own bounding sphere, which the position is keyframed to create an offset for the disintegration.Then, I use an Attribute Create to make temperature and Cd attributes. This is then plugged into a Pyro Source Spread, which uses the source points to spread across the hand mesh.
After the Pyro Source Spread, I also include a Point Wrangle to eliminate any potential flickering at the source points. I am pulling the particle’s source points based off of the totalburn attribute, which I will explain more later, so I used the same attribute here. If the source points had already burned for the set amount of time, this removes the possibility of them continuing to fluctuate in temperature. The code for that is below.


With the temperature / burn now spreading across the mesh, I then need to assign points to be the particle source. Using another Point Wrangle, I utilize the totalburn attribute to create a band of points around the edge of where the burn is spreading. Because totalburn is dependent on time, the code creates a threshold along the burn point, taking into account the edge position a few frames before/after. This effectively makes a ring that can be controlled in width, therefore
allowing more control with the particles later.
The photos below show this band of points spreading across the mesh, starting at each fingertip and continuing down the wrist.


Mesh Disintegration
In order to show the mesh itself disintegrating, I used the attribute information from the Pyro Source Spread. With an attribute transfer, I apply the temperature, burn, pscale and totalburn attributes to the original mesh. Using a delete node with the expression @temperature < 1, the mesh will start to ‘disintegrate’ as the temperature rise spreads through it.
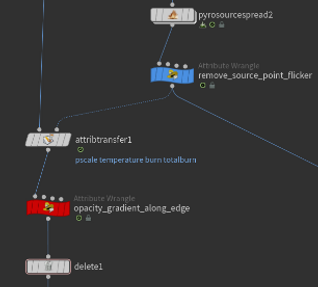

Unfortunately, this method I used resulted in a fairly unclean-looking edge where the mesh deletes. I could’ve applied a different method than Pyro Source to decay the mesh, however I wanted to keep the control given by the keyframed bounding boxes described previously. To solve the issue of the jagged edge, I used a Point Wrangle to create a kind of gradient along the burning edge, which is later used as opacity for the mesh itself; this creates a blend which should hopefully hide the issue.
The output of the wrangle creates an attribute explicitly and plainly named ‘opacity_for_material’. In the viewport, I set the mesh color with this attribute, displayed in blue. Below is an example of low divisions versus high divisions.


Finally, a User_data_float node in the Arnold material calls this opacity attribute and is applied to the material. A range node is needed, as the attribute values can be over 1. This could’ve been done in the code, however was easiest in the material.

Particles
To create the particles causing the illusion of disintegration, I used a combination of a velocity field for the overall shape and POP
forces to further break up the shape. I also found it would be interesting to make the particles look like the shape of smoke. The velocity field is created using a box mesh as the bounding box, converted to a volume, then with attributes controlled by Curl Noise.
In addition to this first layer of particles, I added a second layer that helps to blend the edge between the mesh and particles. This layer uses a similar approach, however the points are given a substantially shorter life expectancy and slower speed limit. These particles also leave a subtle impression of the original mesh, giving an interesting look as the effect takes place.


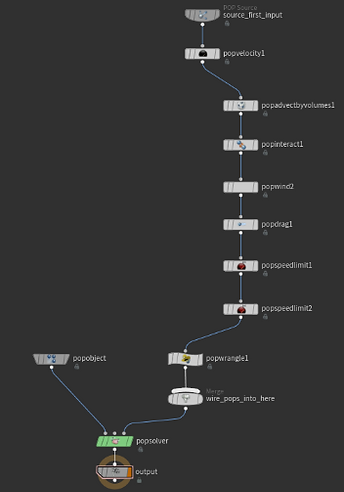
To actually create the particles now, I create another SOP network starting with the disintegration source points created earlier. Here are what each node is doing to the particles within the popnet:
- Pop Velocity gives the particles a bit of starting motion and sets an initial speed
- Advect by Volumes influences the direction of the particles, referencing the created velocity field
- POP Interact causes the particles to spread out from each other
- POP Wind adds a bit of turbulence to the particles
- POP Drag adds the impression of air resistance
- The first POP Speed Limit creates a general speed limit
- The second POP Speed Limit is keyframed to cause the particles to move slower in the beginning of the shot, then allowing them to move fastest at the end.